NOTE: The borders are not available in Preview anymore. We are working on brand new borders. You can still use Preview to plan your feed in advance, use our beautiful filters, and find the best hashtags. If you are looking for borders some alternative apps we recommend are Instasize, Pic Stitch and Photo Collage.
A lot of you have asked me to write an article about the Instagram Photo Editor that is inside Preview App.
There isn’t a day I go without using the Photo Editor in Preview. Whether it’s for the watermark or whitening tool.
I want you to take full advantage of the Photo Editor too because some features will make your Instagram photos look polished and professional in seconds.
The Photo Editor of Preview App is the complete package for any Instagram addict.
There are a lot of features (18 features to be exact) so let’s get right into it.
If you are new around here, Preview App is an Instagram feed planner. It has everything you need to design and manage your Instagram. The Photo Editor is free. Download the App here.
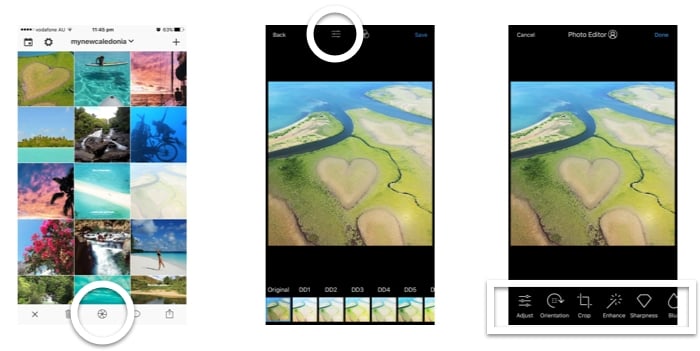
Go in the Photo Editor section
To start, let’s go in the Photo Editor section.
- Select a photo
- Tap the shutter (circle) icon in the middle
- Select the Photo Editor (icon on the top left)
The other icon on the right (the bubbles) is for filters. It will lead you to all the Filter Packs section of Preview App.
In this article, I’m now going to show you each feature inside of the Photo Editor.
I will also share tricks on how you can use them to transform your Instagram photos.
1. Adjust
There are 10 settings in the “Adjust” feature. There are core, editing tools for Instagram.
In here, you can adjust:
- Brightness
- Exposure
- Contrast
- Warmth
- Saturation
- Vibrance
- Highlights
- Shadows
- Tint
- Fade
If you want me to go in details on how to use each of these settings, let me know in the comments and I will write a separate blog post.

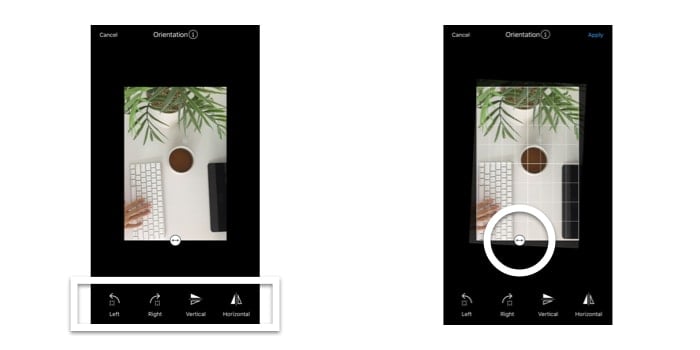
2. Orientation
In “Orientation”, you can rotate and flip photos:
- Left
- Right
- Vertical
- Horizontal
You can also change the horizon by sliding the “arrow” icon left and right.
This is a very useful trick if you need the horizontal lines in your photo to be straight. It makes your photo visually appealing and professional. It’s the details that count.
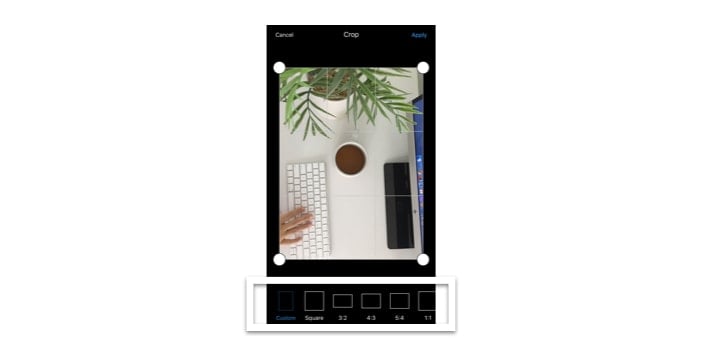
3. Crop
There are 8 cropping options in Preview app.
Crop “Square” whenever you need to apply a white border. This will ensure you get the same white space around every single photo. You will make your whole Instagram theme look well put together.
Also crop “Square” when you plan your Instagram Photo Albums.
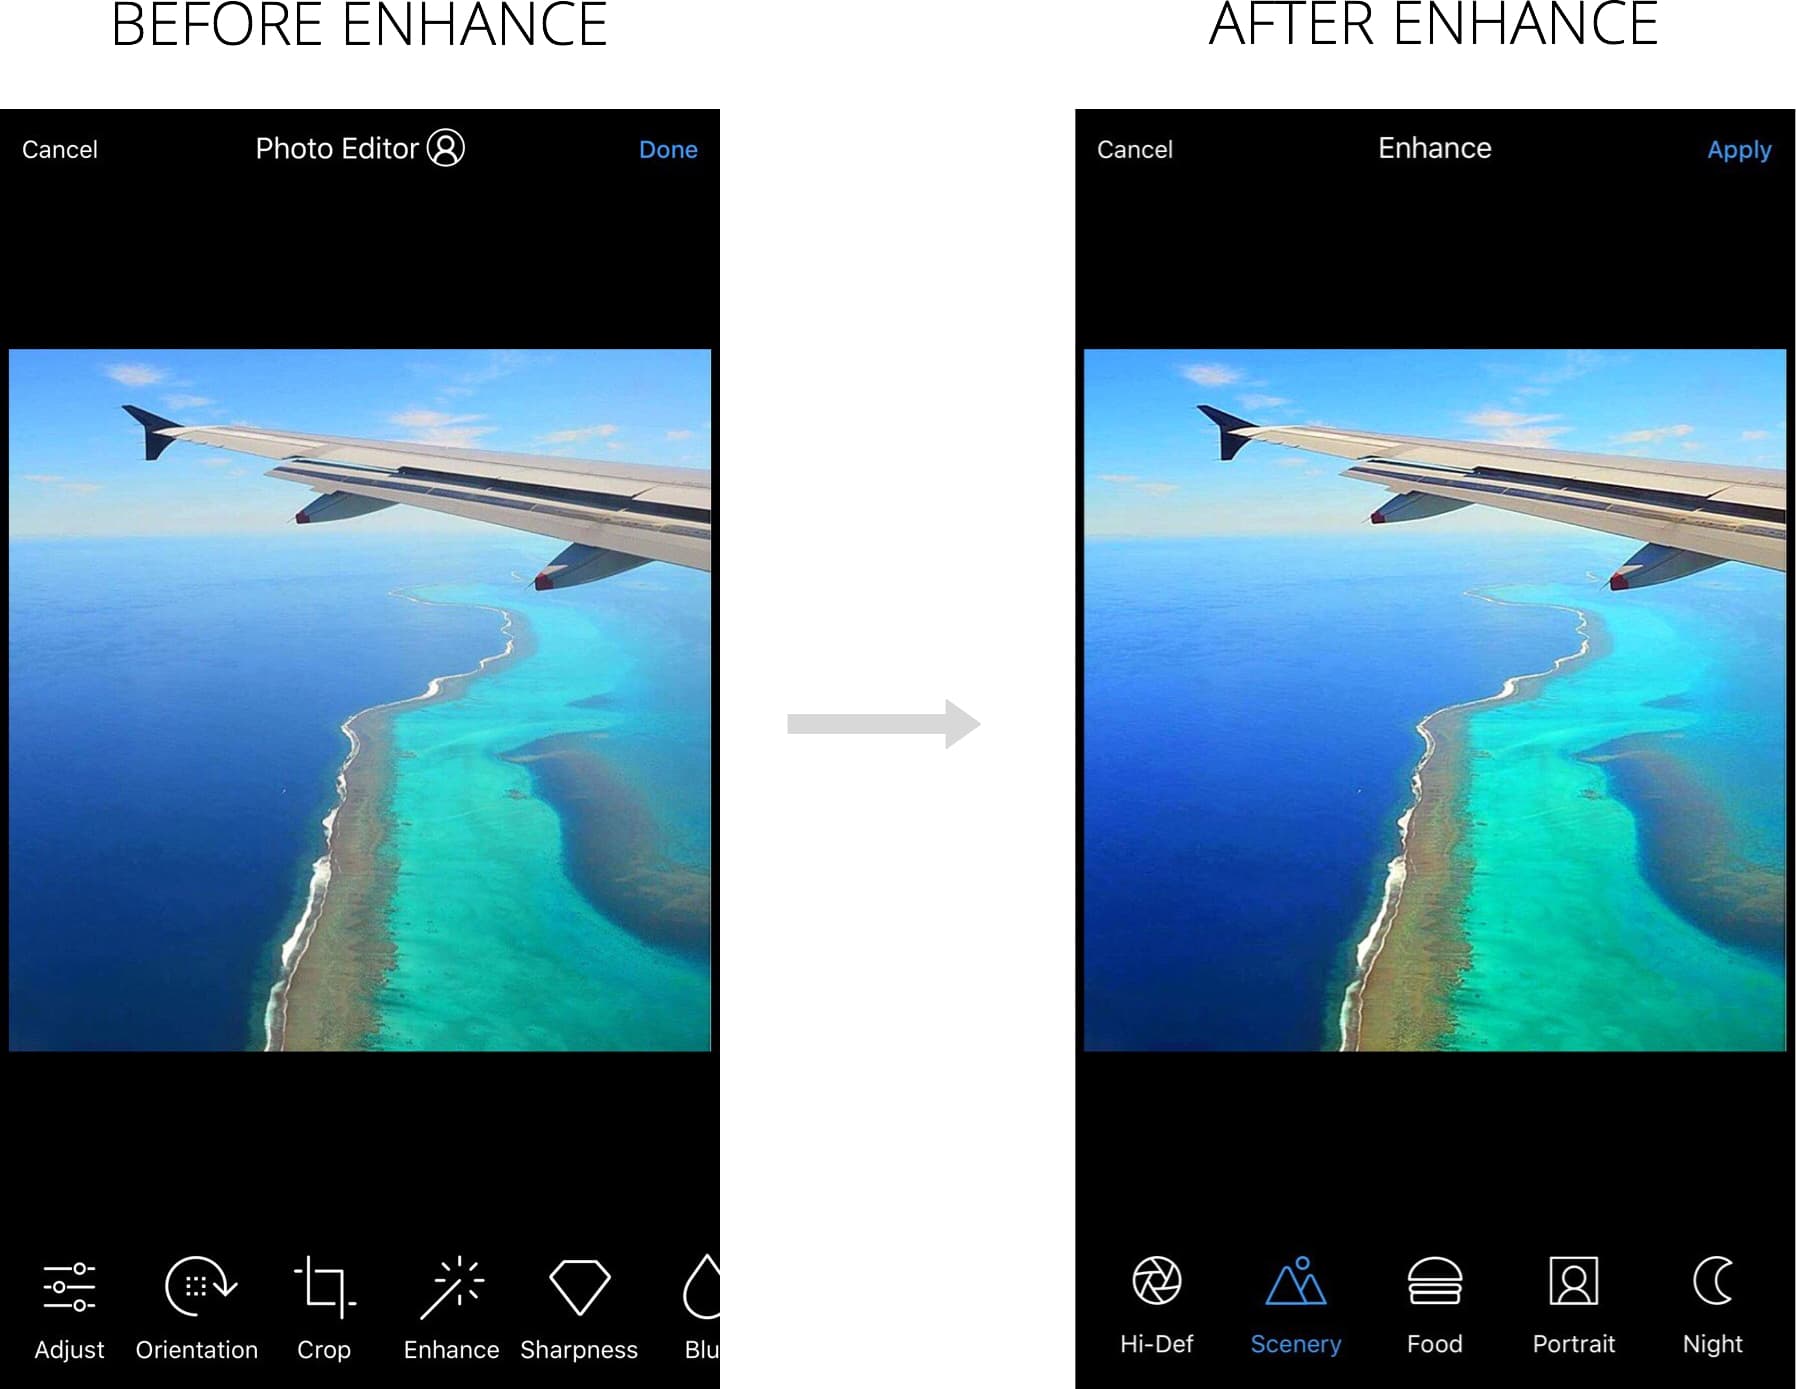
4. Enhance
I strongly recommend you use this tool.
High quality photos get more likes on Instagram.
A very easy way to make your photos look like they are high quality is by using the “Enhance” feature.
There are 4 options available:
- High-Def: highlights and sharpens the whole photo
- Scenery: my personal favorite for any kind of photo (not just landscapes). It increases saturation and highlights the best part of your photo.
- Food: puts all the emphasis on the food
- Portrait: use on selfies
- Night: use on night / dark photos. It highlights the whole photo (I do not recommend using this feature all the time, try “Scenery” instead).
5. Sharpness
This is a great way to make the subject in your photos pop.
Increase “sharpness” just a little bit.
Do not increase sharpness too much otherwise it is obvious you’ve used it and your photo won’t look natural anymore.
Great ways to use sharpness:
- Selfie
- Landscape
- Flatlay
- Still photography
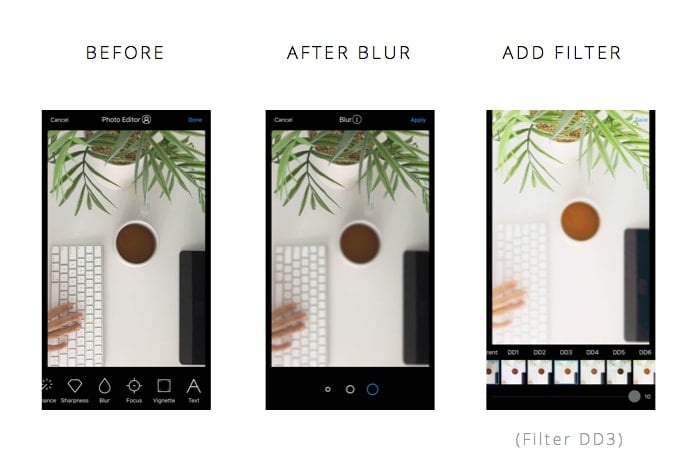
6. Blur
Obviously this tool is to blur out things on your photo.
But you can be as creative as you want with it.
You can make an iPhone photo look like it was taken with a DSLR by blurring the background.
I blur out the whole background of a photo when I want to focus on one subject in particular. It gives a photo an instant depth effect.
For example, this photo:
- I blur the background
- I apply a white filter on top (DD3 in the White II Filter Pack)
- The girl immediately pops out
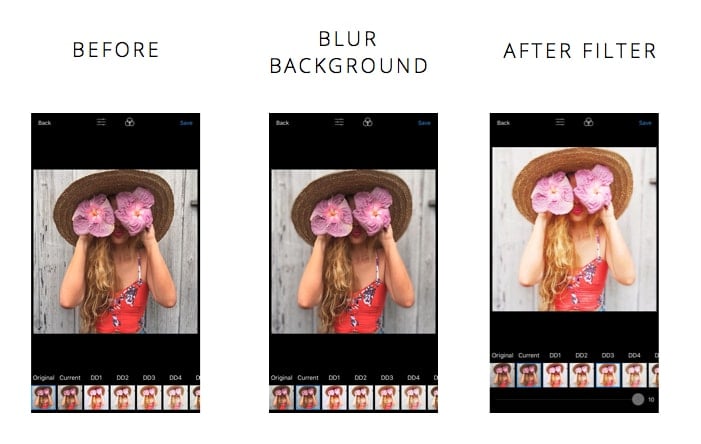
Photo by @ocean_dreamerr
Here is another example:
I wanted to focus on the plant and blurred out the rest.
This is how it turned out.
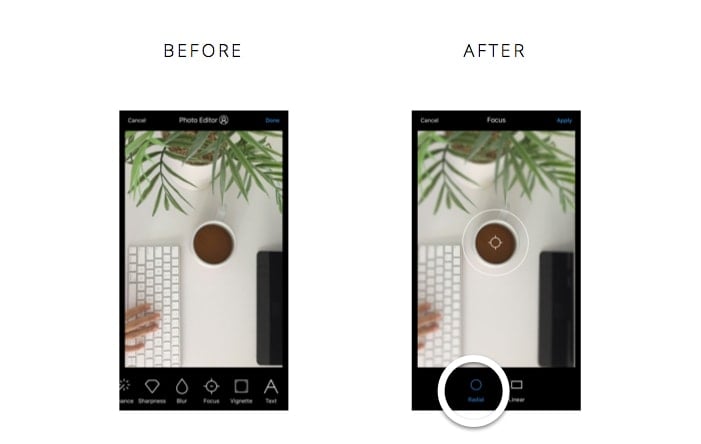
7. Focus
The “Focus” feature will automatically blur out parts of the photo for you.
It is a great way to make your iPhone or Android photos looks professional in 5 seconds.
To me, a photo usually tells a story. What do you want people to focus their attention on? The “Focus” feature helps you “focus” on what matters the most in your photo so you can build your story around it.
Look at my example:
- I use the “Radial” focus to focus on my tea cup.
- Pinch the screen to resize your focus (make it large or small).
- I made the “Radial” focus very small to fit the tea cup only.
- It blurs out the rest of the photo.
- I applied filter DD1 to make it bright and white.
- My story: bright early morning at the desk, sipping on my warm tea.
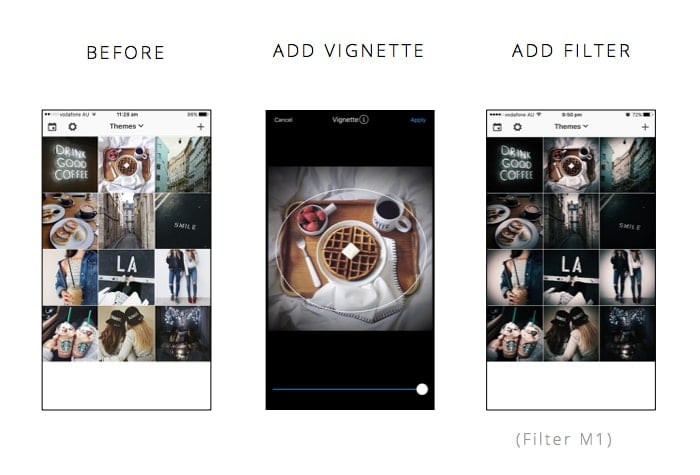
8. Vignette
The “Vignette” darkens the outer corner of your photo.
It would work really well for a Moody and Dark Instagram theme. So if you are using one of these Filter Packs, try to add a vignette to your photo before applying a filter.
Tips to apply the vignette:
- Apply the vignette.
- Hold one finger on the screen to activate the adjustment setting.
- With two fingers adjust the size of the vignette.
- Use the sliding bar on the bottom to adjust the intensity of the vignette.
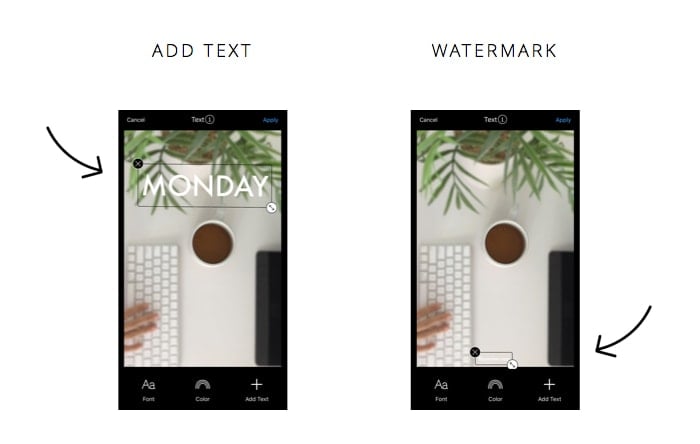
9. Text
Add text on your photo.
It could be a watermark (your Instagram username).
Tips to add text on your Instagram photo:
- Enter text
- Drag corner to adjust size
- Drag center to move the text around
- Change font
- Change color
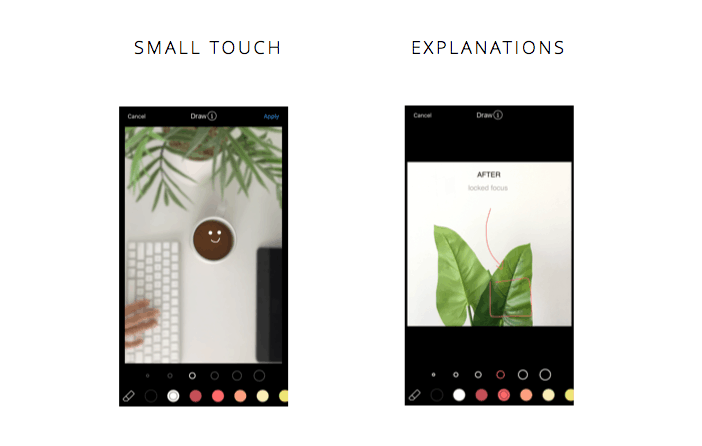
10. Draw
One of my favorite tools.
Let your imagination go wild. Draw on your photo. You don’t have to be a professional artist.
- Draw on photos, add arrows
- Zoom in for more precision
- Use the eraser to delete drawings
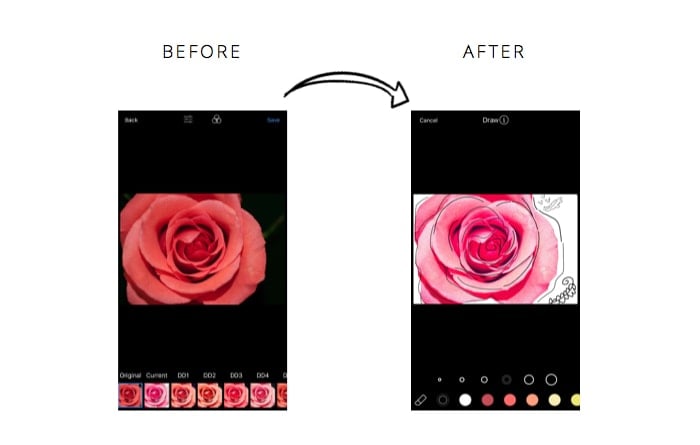
Here is another idea if you want your photos to be artistic (almost Picsart-like).
- Draw the background white.
- Add black lines around the petals.
- Draw other things around the flower.
11. Stickers
Add stickers on your Instagram photos.
From food to love stickers – they’re all fun to play with.
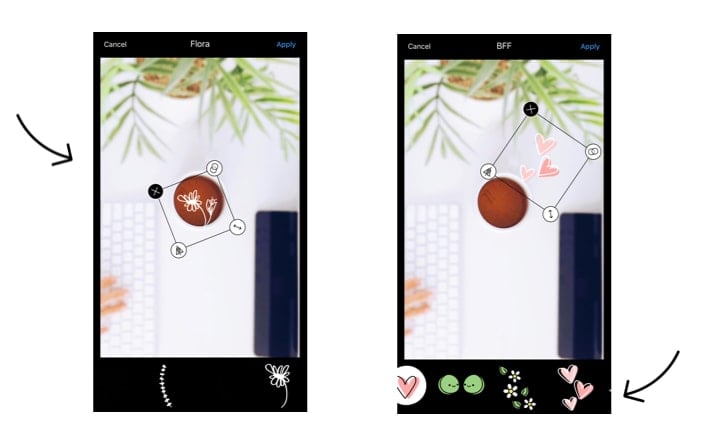
12. Frames
Another favorite: “Frames” (borders).
Preview app comes with a ton of free borders: white, black, floral and more.
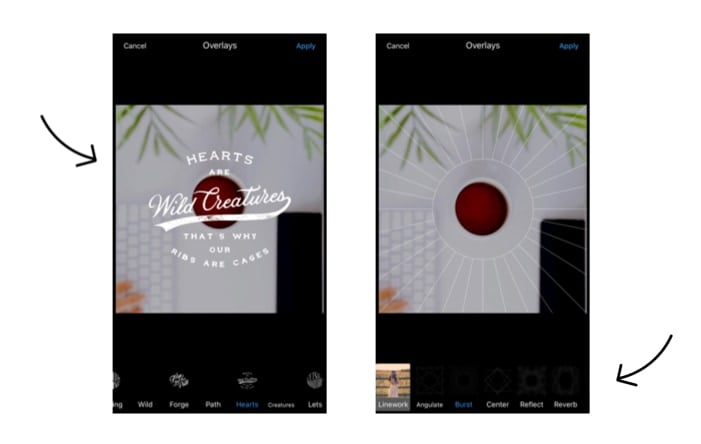
13. Overlays
“Overlays” are a mix of borders and stickers.
- Apply an “Overlay”.
- Your photo will automatically become “square” for the overlay to fit perfectly.
- Hold 2 fingers on the screen to re-adjust your photo (drag up, down, left and right).
14. Blemish
Remove blemishes and pimples on your photos.
You can also use the “Blemish” tool to smooth part of your photo (or body).
- Just tap on the part you want to remove / smooth out.
15. Whiten
Free whitening tool for Instagram photos.
- Brush with your finger on the white area to make it whiter.
- It can be a white background (white wall, table, blanket, pillow).
- A white object (your clothes, your teeth, your eyeballs).
- Zoom in on the photo for more precision.

16. Red eyes
Tap your finger on the red eyes to make them disappear.
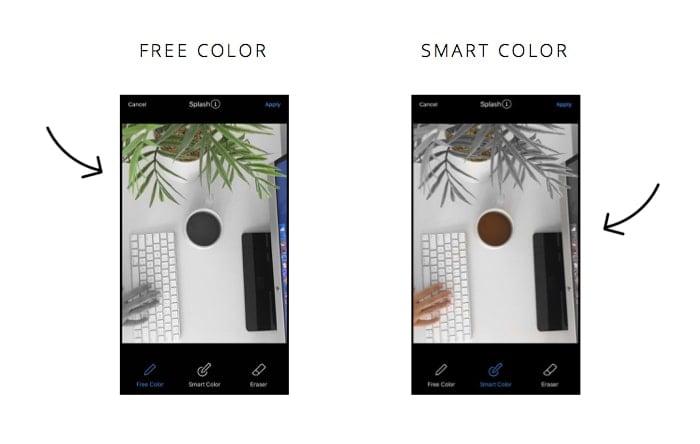
17. Splash
The “Splash” tool is awesome to make unique Instagram themes.
When you use the color splash tool, your photo becomes all black and white. And then you select which part of your photo you want in colors. Brush over an area with your finger to make the color reappear.
There are 2 ways to use the Splash tool:
- Free color: Brush over with your finger any part of the photo to make the colors reappear.
- Smart Color: Only make one color reappear in your photo. Hold your finger on the color, and brush over your entire photo to make only this color reappear. For example, if you want browns to reappear, I select one thing that is brown on the photo (like my cup of tea) and brush over it first and then brush over the entire photo. No other color will reappear.
Tips:
- Apply your filter first. This way your Splash photo will match your feed aesthetics (and if you forget to brush an area of your photo, it won’t look completely different from the rest of your photos).
- Use the Eraser to correct any mistakes.
- Zoom in brush or erase in details.
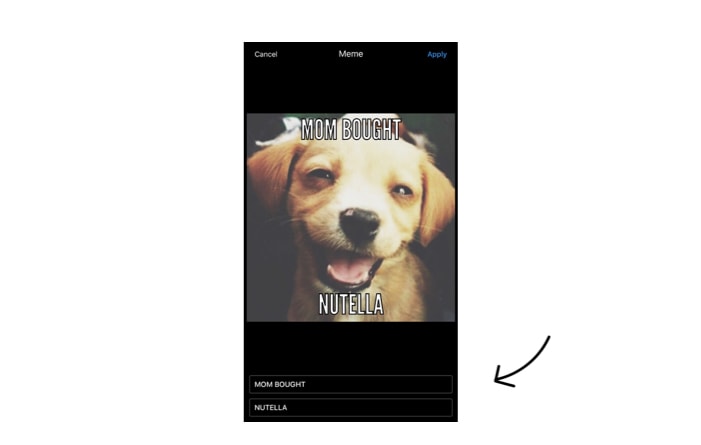
18. Memes
And lastly here is a meme maker.
You know how memes always have two text areas?
This meme maker automatically create those text areas for you.
All you have to do is type your text.
Done.
Best Instagram Photo Editor, or what?
That’s it! These are all the features you will find inside of the Instagram Photo Editor of Preview App. All for free.
Let your imagination run wild. Make amazing themes and customize your photos as you wish.
I’m expecting to see drawings, stickers, text, and maybe vignette on your photos now. Make sure you tag us (@preview.app + #ipreview) on Instagram so we can see how you use the Photo Editor.
Until next time, see you all on Instagram for more tips and tricks!
+400,000 Instagrammers are already using Preview App to edit, plan & schedule their feed. If you haven't tried it, you're missing out.
I just started using this app (Aug 2017) and I’m having trouble aligning my photos so they sit straight. In the article above, the author mentions an arrow icon on the orientation tab, but I’m not seeing an arrow icon. Did the app update? And if so, how do I straighten my photos now?
Here’s a photo to show you what I’m seeing under orientation. https://uploads.disquscdn.com/images/2f668db8ec3c69d91076ac5ac067c530489e110b30ebbda5355f1bc311a569a6.png
Hi Rose! Welcome to our Preview gang! This feature is currently not available on Android phones. We have been working on it. We will add it soon in a future update.
That explains everything. Thank you.
Hi. I am paying monthly for the Preview App. I am unable to use the editor because it splits and stretches my photos. I contacted support and was told it’s an issue with Android phones and that I should try updating the App. I have updated everything on my phone but I’m still unable to edit because of the image distortion. Please see attached photo (this should be a photo of my cat just sitting straight). Images look fine when imported. It’s only in the edit section they are distorted. Is this something that can be fixed? https://uploads.disquscdn.com/images/69e0a0faf7c6f5a3cea381745dfa12f37f91410753e5faf36ca8392d8a48b95f.png
Girlfriend and I are having the exact same issue of skewed photos after editing. What’s the solution Preview Team ?
I´m a very new user for the app and I´ve been reading a lot about the app… I read that there is something called “effects”, but I´m not able to find nothing like that in the app… Could you guide me on this matter?
Hello! How do I use the effects. The option only showed up one time. Where is this feature and how can I use it consistently? I downloaded different effects and would like it to use them.
Did you ever get a reply on how to use the effects?
Literally having the same problem and have only been able to edit 2 photos with “effects” then the options disappears! Haven’t been able to get in contact with anyone about this! Extremely frustrating
Hello! Please send us an email at [email protected]
Hello how do i use the effects? i cant find it though I’ve downloaded a bunch.
Please send us an email at [email protected]
Hello! For some reason I can’t use the frames… The app keeps saying Option not valid. Could you help me with it, please? Thank you. Marina
I don’t have Frames and Overlay in my Preview. What should i do to add it?
Unfortunately the borders are not available anymore in Preview.
You can still use to design your feed, schedule your posts and edit your photos. We will add new borders again soon!
Hello, I don’t have the stickers 🙁 After the “text” option I have the “draw” option, no stickers anywhere.
Also the text editor is pretty weird. I can’t change the text to be centered but it always appears left justified. It doesn’t matter how big I make the text box, after about 10 words I can’t type anything else and have to make a new text box. Is this normal?